SolidWorks API Resources
Short list of SolidWorks 2017 API online resources.
Short list of SolidWorks 2017 API online resources.
Learn Macros. Automate Excel.
Recording macros can save huge amounts of time by automating a procedure or series of operations that you would otherwise have to do manually.

Example: Formatting Financial Data.
Suppose I want to format a worksheet of financial data that I’ve downloaded, but I need to do the same thing to five other worksheets. Let’s make use of the developer tab by:
1. Recording the macro
2. Perform a set of operations
a. Delete columns G-M
b. Make the column headers bold.
c. Apply cell borders.
d. Apply financial data type to columns B-E.
e. Apply conditional formatting to column one based on the daily trend.
f. Center text.
3. Stop recording the macro.
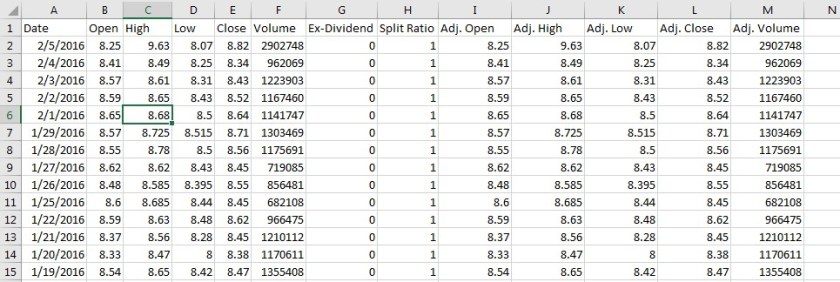
Raw Data:
Processed Data:

Now we open the next worksheet we want to process Developer > Macros > “FormatFinancialData” > Click Run. And that’s that.
But what if I have to do this on a ton of worksheets?
Developer > Visual Basic > Modules > “Module1”
Below your recorded macro, paste the following lines of code:
Sub RunOnAllOpenSheets()
Dim WB As Workbook
Dim WS As Worksheet

For Each WB In Workbooks
    For Each WS In WB.Worksheets
        If WB.Name <> ThisWorkbook.Name Then
        WS.Activate
        Call FormatFinancialData
        End If
    Next WS
Next WB

End Sub
This will format the data on all worksheets of all open workbooks except the one where the macro is stored.
Calling Additional Macros:
You can call additional Macros by simply calling out their name in the RunOnAllOpenSheets macro:
Sub RunOnAllOpenSheets()
Dim WB As Workbook
Dim WS As Worksheet

For Each WB In Workbooks
    For Each WS In WB.Worksheets
        If WB.Name <> ThisWorkbook.Name Then
        WS.Activate
        Call FormatFinancialData
        Call AdditionalMacro1
        Call AdditionalMacro2
        End If
    Next WS
Next WB

End Sub

Private Sub Worksheet_Change(ByVal Target As Range)
If Target = Range("A2") Then
Call Macro1
End If
End Sub
Private Sub Worksheet_Change(ByVal Target As Range)
If Target = Range("A2") Then
Call Macro1
End If
End Sub
But what if I don’t want to have the workbook open?
Note: This will only work with Outlook
Sub SendThisSpreadsheet()
    Dim Outlook As Object
    Dim Email As Object

    Set Outlook = CreateObject("Outlook.Application")
    Set Email = Outlook.CreateItem(0)
    With Email
        .to = "test@mailinator.com"
        .subject = "This is a Test"
        .body = "Hello," & vbNewLine & vbNewLine & _
              "Here is an updated version of MyWorkbook." & _
              vbNewLine & vbNewLine & "Thank you"
        .Attachments.Add _
         ("C:\Users\User\Documents\Spreadsheets\MyWorkbook.xls")
        .Display
        .Send
    End With
End Sub
b. This code sends an updated version of your spreadsheet out to the email addresses specified in the “.to” line of the code. Multiple addresses should be separated by commas inside the quotation marks.
c. The body of the email can be updated by changing the “.body” line of the code.
d. Replace “C:\Users\User\Documents\Spreadsheets\MyWorkbook.xls” with the path of the file you would like to send.
2. This code can be combined with the techniques described in the previous section to completely automate your email update process.
