Hole/Shaft Tolerance Calculator

Calculate Hole/Shaft Tolerances using Excel.

Here’s is an Excel-based calculator for determining the tolerances required to achieve standard metric hole/shaft fits.  Download the calculator here.

As shown in the image above, the user inputs a basic size (Cell B3) and selects the desired fit from the dropdown menu (Cell A3).  The upper and lower limits are instantly calculated for both the shaft and bore.  The results are displayed in the cells highlighted green.

All calculations are based on the methods described in Shigley’s Mechanical Engineering Design (9th Edition).  

Check if file exists with VBA

UDF for checking if a file exists.

As mentioned in the title, the code below is for checking if a file exists in a certain directory. I find this function useful for monitoring if drawings have been created and are ready for production.

Public Function InFolder(Folderpath As String, Filename As String, FileExtension As String) As Boolean
'Infolder returns TRUE if a file is found in the specified folderpath

'Add backslash (\) to end of folderpath if there isn't one
If Right(Folderpath, 1) <> "\" Then
Folderpath = Folderpath & "\"
End If

'Add period (.) to front of file extension if there isn't one
If Left(FileExtension, 1) <> "." Then
FileExtension = "." & FileExtension
End If

'Create filepath from input arguments
Filepath = Folderpath & Filename & FileExtension

'Check if file exists
If Dir(Filepath) <> "" Then
InFolder = True
Else
InFolder = False
End If

End Function

You can either save this directly in your current workbook or if you’d like the function available in all workbooks, save it to a AddIn file (.xlam) in the default folder and enable the AddIn through File>Options>AddIns>Go.

If you are typing arguments in directly, then you will need quotes. However, if you are referencing other cells as input, quotes are unnecessary.

Generating Math Tests with Python

Auto-Generate Unique Tests

This is a script for generating a bunch of unique math tests from a “Test Template” and a spreadsheet containing test inputs and problem solutions.

In our Test Template we set the layout of our test and define our test problems. Our test problems will have variable placeholders (TestID, Question ID, VarA, etc.) that we will replace with data from our “Test Data” spreadsheet.

In our excel file, we random generate values for the A, B, and C variables (using the =RANDBETWEEN() function) and clearly identify which Question, Equation, and Test ID they correspond to. In the Excel file, we’ll calculate solutions using the input data and equation listed for each entry.

Next, we can run our script. This is dependent on the docx (Note: pip install python-docx), docx2txt, re, pandas, and tkinter libraries.  Forms will pop-up prompting you for the Test Template and Test Data files.

"""
Creates unique test documents with data
taken from a DataFrame (which is populated from an excel file).

Input: Test Template (Word Document).  Test Data (Excel File)
Output: 20 Unique Tests (Test Data)
"""
#Import modules
import docx
import docx2txt
import pandas as pd
import re
from tkinter import Tk
from tkinter import filedialog

Tk().withdraw()

#Define "Test" template
template_file=filedialog.askopenfilename(title="Please select Word template")
testdata_file=filedialog.askopenfilename(title="Please select Test Data spreadsheet")

#Read file data
template_text=docx2txt.process(template_file)
testdata=pd.read_excel(testdata_file)

#Produce 20 unique tests
for i in range(20):
    new_text=template_text
    #Add data for 10 unique questions
    for j in range(10):
        #Define replacement dictionary
        #http://stackoverflow.com/questions/6116978/python-replace-multiple-strings
        rep={'QuestionID':str(testdata['Question'][i+j*20]),
             'VarA':str(testdata['VarA'][i+j*20]),
             'VarB':str(testdata['VarB'][i+j*20]),
             'VarC':str(testdata['VarC'][i+j*20])}
        rep=dict((re.escape(k),v) for k, v in rep.items())
        pattern=re.compile("|".join(rep.keys()))
    
        if j==0:
            new_text=pattern.sub(lambda m: rep[re.escape(m.group(0))],template_text,count=4)
            new_text=new_text.replace('TestID','Test #' + str(i+1))
        else:
            new_text=pattern.sub(lambda m: rep[re.escape(m.group(0))],new_text,count=4)
            
    #Create and save new test document
    test_doc=docx.Document()
    test_doc.add_paragraph(new_text)
    test_doc.save(r'C:\Users\Craig\Documents\Python Scripts\Test #'+str(i+1)+'.docx')

After the files have been selected, the script reads the Test Template text and loads the Test Data into a DataFrame. We then loop through the Test Data and produce 20 unique test documents by substituting the placeholder variables with values from the Test Data spreadsheet. Each test document is clearly labeled and we can use our original Test Data as our answer key.

Thanks to Andrew Clark for his code for replacing multiple text strings.

Reading & Writing Excel Data with Python

Using pandas to read/write data in Excel.

In this post we’re going to explore how easy it is to read and write data in Excel using Python.  There’s a few different ways to do this.  We’re going to use pandas.  The pandas DataFrame  is the main data structure that we’re going to be working with.

Reading

The sample Excel data we’ll be using is available on Tableau’s Community page.

To load a single sheet of the Excel file into Python, we’ll use the read_excel function:

import pandas as pd
sales_data=pd.read_excel(r'C:\Users\Craig\Downloads\Sample - Superstore Sales (Excel).xls')

This loads one tab of the spreadsheet (.xls, .xlsx, or .xlsm) into a DataFrame.

In fact, if we didn’t want to download the Excel file locally, we can load it into Python directly from the URL:

sales_data_fromURL=pd.read_excel('https://community.tableau.com/servlet/JiveServlet/downloadBody/1236-102-1-1149/Sample%20-%20Superstore%20Sales%20(Excel).xls')

Note that we can load specific sheets (sheetname), grab specific columns (parse_cols), and handle N/A values (na_values) by using the optional keyword arguments.

To load all of the sheets/tabs within an Excel file into Python, we can set sheetname=None:

sales_data_all=pd.read_excel(r'C:\Users\Craig\Downloads\Sample - Superstore Sales (Excel).xls', sheetname=None)

This will return a dictionary of DataFrames – one for each sheet.

Writing

Writing existing Python data to an Excel file is just as straightforward.  If our data is already a DataFrame, we can call the pd.DataFrame.to_excel(‘filename.xlsx’) function.  If not, we can just convert the data into a DataFrame and then call to_excel.

import pandas as pd
import numpy as np
df=pd.DataFrame(np.random.randn(50,50))
df.to_excel('MyDataFrame.xlsx')

This will work for the .xls, .xlsx, and .xlsm.  Pandas also writer functions such as to_csv, to_sql, to_html, and a few others.

To write data on multiple sheets, we can use the pd.ExcelWriter function as shown in the pandas documentation:

with pd.ExcelWriter('filename.xlsx') as writer:
    df1.to_excel(writer, sheet_name='Sheet1')
    df2.to_excel(writer, sheet_name='Sheet2')

Quick Data Grabs

Try experimenting with the

pd.read_clipboard() #and
pd.to_clipboard()

functions to quickly transfer data from Excel to Python and vice-versa.

Thank you, pandas, for creating and maintaining excellent documentation.

Automated Email with Python

Automated email notifications and task tracking system.

This article explains how to use a Python script in conjunction with a simple Action Tracking spreadsheet to create an automated email notifications and task-tracking system for your team.

To begin, let’s setup our “ActionTracker” spreadsheet as shown below:

ActionTracker_Overview

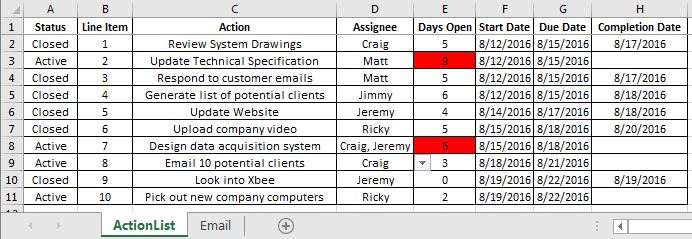
We can use the expression “=IF(ISBLANK(H2)=TRUE,”Active”,”Closed”)” in our Status column to acknowledge when a date has been entered in the “Completion Date” column.  This will help our script later on.

The “Days Open” column can be calculated using “=IF(ISBLANK(H2)=FALSE,H2-F2,TODAY()-F2)”.  As your list grows, be sure to drag down your formulas.

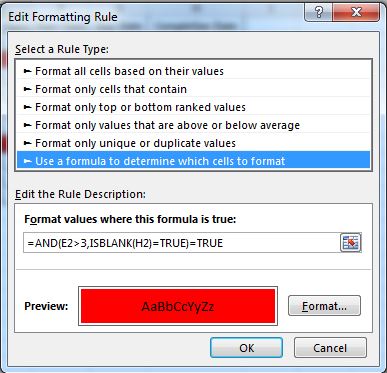
It can be helpful to apply conditional formatting here in order to see which items are “Open” and late, so that we know which items we expect to send notifications about.  This can be accomplished by the expression shown below, but it is not a necessary step.  Again, remember to update your applicable range as your list grows.

ConditionalFormatting

On our “Email” tab, we’ll list our unique assignees by name and add their email addresses (separated by a comma and a space) in column B.

EmailTab

In order to minimize errors, we can apply a Data Validation rule to our “Assignee” column on the “ActionList” tab.  We’ll select all of the unique names on our “Email” tab as the Source validation criteria.  New emails can easily be added to this list, however, we must update our Source range.

DataValidation

Here’s a download link for the ActionTracker template.

Next, we’ll use the following Python script to send automated email notifications to our team for any Open actions that are open for more than three days.  The three day threshold can be easily adjusted in line #50 of the script below.

Note: In order to allow the script to access your gmail account, make sure that your less secure app access settings are currently turned on.

import smtplib
import pandas as pd
import sys
from tkinter import Tk
from tkinter import filedialog
from email.mime.text import MIMEText
from email.mime.multipart import MIMEMultipart

#Define email login information.
from_email="_____@gmail.com" #Replace with your email address.  Must be gmail.
pw="_____" #Replace with gmail password.

#Select file to use.
Tk().withdraw()
filepath=filedialog.askopenfilename(defaultextension='*.xlsx',
                                    filetypes=[('.xlsx files','*.xlsx'),
                                               ('All files','*.*')],
                                    initialdir=r'C:\Users')
if filepath=="." or filepath=="":
    sys.exit(0)

#Import ActionTracker
ActionTracker = pd.DataFrame(pd.read_excel(filepath,sheetname='ActionList',
                                           parse_cols='A:E'))
ActionTracker_maxrow=len(ActionTracker)
status=ActionTracker.iloc[:,0]
LineItem=ActionTracker.iloc[:,1]
action=ActionTracker.iloc[:,2]
person=ActionTracker.iloc[:,3]
DaysOpen=ActionTracker.iloc[:,4]

#Import Email Addresses by name
EmailList=pd.DataFrame(pd.read_excel(filepath,sheetname='Email',index_col=0,
                                     parse_cols='A:B'))

#Establish connection to gmail server, login.
server = smtplib.SMTP('smtp.gmail.com',587)
server.starttls()
server.login(from_email, pw)

msg=MIMEMultipart('alternative')
msg.set_charset('utf8')
msg['FROM']=from_email

#Initialize a list of submittals with invalid email addresses
invalid_addresses=[]

#Send emails to late Action Tracker assignees
for i in range(0,ActionTracker_maxrow):
    if status[i]=='Active' and DaysOpen[i]>3:
        print('Active Line Item #'+str(LineItem[i])+': '+person[i])
        msg=MIMEText("Action Tracker Line Item #" + str(LineItem[i]) + " has been open for " +
                     str(DaysOpen[i]) + " days.\n\n" + str(action[i]) +
                     "\n\nPlease take action.",_charset="UTF-8")
        msg['Subject']="Open Action #" + str(LineItem[i])
        msg['TO']=str(EmailList.iloc[EmailList.index.get_loc(person[i]),0])
        try:
            server.sendmail(from_email, msg['TO'].split(","),
                            msg.as_string())
        except smtplib.SMTPRecipientsRefused:
            invalid_addresses.append(LineItem[i])
            print('Line Item #' + str(LineItem[i]) + 'has an invalid email address.')

if len(invalid_addresses) != 0:
    for i in range(0,len(invalid_addresses)):
        invalid_addresses[i]=invalid_addresses[i].strip('\xa0')
    try:
        if len(invalid_addresses)==1:
            msg=MIMEText(str(invalid_addresses) +
            " has an invalid email address associated with the responsible party.",
            _charset="UTF-8")
        else:
            msg=MIMEText(str(invalid_addresses) +
                             " have invalid email addresses associated with the responsible parties.",
                             _charset="UTF-8")
        msg['Subject']='Invalid Email Addresses'
        msg['TO']=str(from_email)
        server.sendmail(from_email, msg['TO'].split(","),
                        msg.as_string())
    except smtplib.SMTPRecipientsRefused:
        print('Invalid Email Address notification email failed.')

server.quit()


And that’s it.  Full automation can be achieved by hard-coding in the file location and using Windows Task Scheduler to execute the Python script.

Finding Correlations

Script for normalizing and finding correlations across variables in a numeric dataset.  Data can be analyzed as a whole or split into ‘n’ many subsets.  When split, normalizations are calculated and correlations are found for each subset.

Input is read from a .csv file with any number of columns (as shown below).  Each column must have the same number of samples.  Script assumes there are headers in the first row.

Input

import numpy as np

#Divides a list (or np.array) into N equal parts.
#http://stackoverflow.com/questions/4119070/how-to-divide-a-list-into-n-equal-parts-python
def slice_list(input, size):
    input_size = len(input)
    slice_size = input_size // size
    remain = input_size % size
    result = []
    iterator = iter(input)
    for i in range(size):
        result.append([])
        for j in range(slice_size):
            result[i].append(iterator.__next__())
        if remain:
            result[i].append(iterator.__next__())
            remain -= 1
    return result

#Functions below are from Data Science From Scratch by Joel Grus
def mean(x):
    return sum(x)/len(x)

def de_mean(x):
    x_bar=mean(x)
    return [x_i-x_bar for x_i in x]

def dot(v,w):
    return sum(v_i*w_i for v_i, w_i in zip(v,w))

def sum_of_squares(v):
    return dot(v,v)

def variance(x):
    n=len(x)
    deviations=de_mean(x)
    return sum_of_squares(deviations)/(n-1)

def standard_deviation(x):
    return np.sqrt(variance(x))  

def covariance(x,y):
    n=len(x)
    return dot(de_mean(x),de_mean(y))/(n-1)

def correlation(x,y):
    stdev_x=standard_deviation(x)
    stdev_y=standard_deviation(y)
    if stdev_x >0 and stdev_y>0:
        return covariance(x,y)/stdev_x/stdev_y
    else:
        return 0

#Read data from CSV
input_data=np.array(np.genfromtxt(r'C:\Users\Craig\Documents\GitHub\normalized\VariableTimeIntervalInput.csv',delimiter=",",skip_header=1))
var_headers=np.genfromtxt(r'C:\Users\Craig\Documents\GitHub\normalized\VariableTimeIntervalInput.csv',delimiter=",",dtype=str,max_rows=1)

#Determine number of samples & variables
number_of_samples=len(input_data[0:,0])
number_of_allvars=len(input_data[0,0:])

#Define number of samples (and start/end points) in full time interval
full_sample=number_of_samples
full_sample_start=0
full_sample_end=number_of_samples

#Define number of intervals to split data into
n=2
dvar_sublists={}
max_sublists=np.zeros((number_of_allvars,n))
min_sublists=np.zeros((number_of_allvars,n))
subnorm_test=np.zeros((full_sample_end, number_of_allvars+1))

#Slice variable lists
for dvar in range(0,number_of_allvars):
    dvar_sublists[dvar]=slice_list(input_data[:,dvar],n)
    for sublist in range(0,n):
        max_sublists[dvar,sublist]=np.max(dvar_sublists[dvar][sublist])
        min_sublists[dvar,sublist]=np.min(dvar_sublists[dvar][sublist])

var_interval_sublists=max_sublists-min_sublists

#Normalize each sublist.
for var in range(0, number_of_allvars):
    x_count=0
    for n_i in range(0,n):
        sublength=len(dvar_sublists[var][n_i])
        for x in range(0,sublength):
            subnorm_test[x_count,var]=(dvar_sublists[var][n_i][x]-min_sublists[var,n_i])/var_interval_sublists[var,n_i]
            subnorm_test[x_count,6]=n_i
            x_count+=1

var_sub_correlation=np.zeros((n,number_of_allvars,number_of_allvars),float)

#Check for correlation between each variable
for n_i in range(0,n):
    for i in range(0,number_of_allvars):
        icount=0
        for j in range(0,number_of_allvars):
            jcount=0
            starti=icount*len(dvar_sublists[i][n_i])
            endi=starti+len(dvar_sublists[i][n_i])
            startj=icount*len(dvar_sublists[j][n_i])
            endj=startj+len(dvar_sublists[j][n_i])
            var_sub_correlation[n_i,i,j]=correlation(subnorm_test[starti:endi,i],subnorm_test[startj:endj,j])

#Writes to CSV
np.savetxt(r'C:\Users\Craig\Documents\GitHub\normalized\sublists_normalized.csv',subnorm_test, delimiter=",") 

print(var_sub_correlation, 'variable correlation matrix')

Unique Values from Spreadsheet

Python script for extracting all unique values from each tab of a spreadsheet.
Logs results in Output.csv in the same directory as .py file.


import pandas as pd
import xlrd
from tkinter import Tk
from tkinter import filedialog
 
def UniqueValuesFromSpreadsheet(WorkbookPath,sheet_name):
     df=pd.DataFrame(pd.read_excel(WorkbookPath,sheetname=sheet_name, header=None,index_col=False))   
     df2=pd.unique(df.values.ravel())
     return df2

Tk().withdraw()     
filename=filedialog.askopenfilename()
SheetNames=xlrd.open_workbook(filename).sheet_names()
NumSheets=len(SheetNames)
 
Results={}
 
for i in range(0,NumSheets):
    Results[SheetNames[i]] = UniqueValuesFromSpreadsheet(filename,i)
    print(SheetNames[i], UniqueValuesFromSpreadsheet(filename,i))
 
with open('Output.csv', 'w') as f:
    f.write('{0},{1}\n'.format("Sheet Name", "Value"))    
    for key in Results:
        for i in range(0,len(Results[key])):
           if str(Results[key][i]) != 'nan':
                f.write('{0},{1}\n'.format(key, Results[key][i]))               
                print(key, Results[key][i])

The First Three Steps in Automating Excel

Learn Macros. Automate Excel.

1. Record Macros

Recording macros can save huge amounts of time by automating a procedure or series of operations that you would otherwise have to do manually.

  1. First add the “Developer” tab by following these steps:
    a. File > Options > Customize the Ribbon
    b. Check the “Developer” tab.

1.1

  1. Recording a basic macro. Recording macros and watching the code appear is also a fantastic way to learn Visual Basic.
    a. Developer tab > Click “Record Macro”
    b. Perform a set of operations
    c. Developer tab > Click “Stop Recording”

Example: Formatting Financial Data.

Suppose I want to format a worksheet of financial data that I’ve downloaded, but I need to do the same thing to five other worksheets. Let’s make use of the developer tab by:

1. Recording the macro
2. Perform a set of operations
a. Delete columns G-M
b. Make the column headers bold.
c. Apply cell borders.
d. Apply financial data type to columns B-E.
e. Apply conditional formatting to column one based on the daily trend.
f. Center text.
3. Stop recording the macro.

Raw Data:

1.2

Processed Data:

1.3
Now we open the next worksheet we want to process Developer > Macros > “FormatFinancialData” > Click Run. And that’s that.

But what if I have to do this on a ton of worksheets?

Developer > Visual Basic > Modules > “Module1”

Below your recorded macro, paste the following lines of code:


Sub RunOnAllOpenSheets()
Dim WB As Workbook
Dim WS As Worksheet

For Each WB In Workbooks
    For Each WS In WB.Worksheets
        If WB.Name <> ThisWorkbook.Name Then
        WS.Activate
        Call FormatFinancialData
        End If
    Next WS
Next WB

End Sub

This will format the data on all worksheets of all open workbooks except the one where the macro is stored.

Calling Additional Macros:

You can call additional Macros by simply calling out their name in the RunOnAllOpenSheets macro:


Sub RunOnAllOpenSheets()
Dim WB As Workbook
Dim WS As Worksheet

For Each WB In Workbooks
    For Each WS In WB.Worksheets
        If WB.Name <> ThisWorkbook.Name Then
        WS.Activate
        Call FormatFinancialData
        Call AdditionalMacro1
        Call AdditionalMacro2
        End If
    Next WS
Next WB

End Sub


2. Perform Tasks Automatically

Run a Macro Each Time the Workbook is Opened:

  1. Open a workbook. Go to the Developer tab.
  2. Click on Visual Basic. Double-click on “ThisWorkbook” in the Project Explorer on the left-hand side.
  3. In the first dropdown menu, select “Workbook”, on the second dropdown menu, select “Open”.
  4. Add the code that you want to execute or call one (or more) of your existing macros as shown below:

2.1

Run a Macro When a Cell Changes:

  1. Open a workbook. Go to the Developer tab.
  2. Click on Visual Basic. Double-click on “Sheet1 (Sheet1)” in the Project Explorer on the left-hand side.
  3. In the first dropdown menu, select “Worksheet”. In the second dropdown menu, select “Change”.
  4. Add an If-statement that specifies the cell (or range) that when changed, will trigger your macro(s).  In this case, we specify the cell “A2”.

Private Sub Worksheet_Change(ByVal Target As Range)
If Target = Range("A2") Then
Call Macro1
End If
End Sub

Run a Macro at a Scheduled Time (Part 1):

  1. Open a workbook. Go to the Developer tab.
  2. Click on Visual Basic. Double-click on “ThisWorkbook” in the Project Explorer on the left-hand side.
  3. In the first dropdown menu, select “Workbook”. In the second dropdown menu, select “Open”.
  4. Add the following line of code to specify the name of the macro and the time you would like it to run.

Private Sub Worksheet_Change(ByVal Target As Range)
If Target = Range("A2") Then
Call Macro1
End If
End Sub

  1. Confirm that the macro you want to run is contained in a module in an open workbook.
  2. Save the file as a macro-enabled workbook and re-open it.
  3. In order for the macro to run at the given time, the workbook must be open.

But what if I don’t want to have the workbook open?

Run a Macro at a Scheduled Time (Part 2):

  1. Write your Macro (and macro calls) in the “Workbook – Open” window in VBA.
  2. Save your file.
  3. In the Windows start menu, search for “Task Scheduler” and open the application.
  4. Action > Create Task
    a. General > Name Your Task
    b. Triggers > New > Begin the task: “On a Schedule”
    i. Schedule your task appropriately
    c. Actions > New > Browse
    i. Select your .xlsm file

3. Automatically Send Reports

Note: This will only work with Outlook

  1. Developer > VBA > Insert Module
    a. Paste the following code into your module:

Sub SendThisSpreadsheet()
    Dim Outlook As Object
    Dim Email As Object

    Set Outlook = CreateObject("Outlook.Application")
    Set Email = Outlook.CreateItem(0)
    With Email
        .to = "test@mailinator.com"
        .subject = "This is a Test"
        .body = "Hello," & vbNewLine & vbNewLine & _
              "Here is an updated version of MyWorkbook." & _
              vbNewLine & vbNewLine & "Thank you"
        .Attachments.Add _
         ("C:\Users\User\Documents\Spreadsheets\MyWorkbook.xls")
        .Display
        .Send
    End With
End Sub


b. This code sends an updated version of your spreadsheet out to the email addresses specified in the “.to” line of the code. Multiple addresses should be separated by commas inside the quotation marks.
c. The body of the email can be updated by changing the “.body” line of the code.
d. Replace “C:\Users\User\Documents\Spreadsheets\MyWorkbook.xls” with the path of the file you would like to send.
2. This code can be combined with the techniques described in the previous section to completely automate your email update process.

Sources

Automatic Emails with Outlook

Calloway EOD Prices – Quandl

Macro Task Scheduler

Mailinator

Run Macro at Schedule Time (Part 1)

Run Macro When Cell Changes

Run Macro When Workbook Opens

Run On All Open Workbooks

Send Emails Automatically

VBA Function Library